
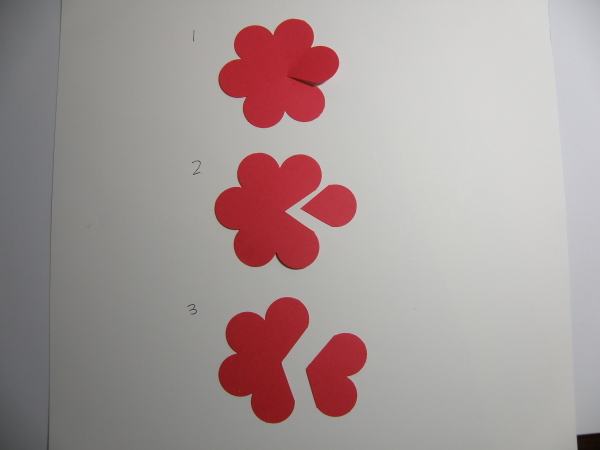
cut one petal completely out as shown in #2, Cut 2 petals competely out as shown in #3.

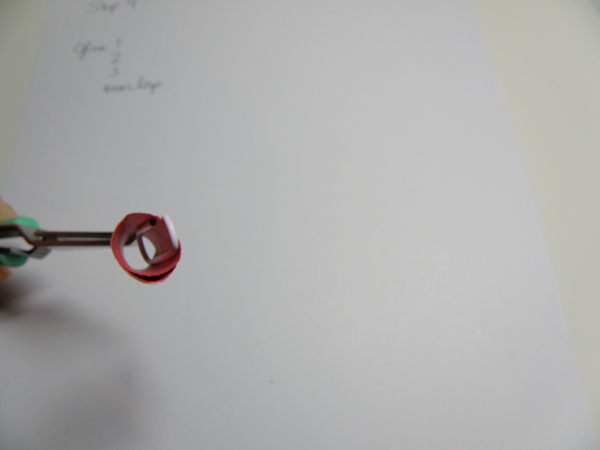 This is the 2 petals you cut out of the 3rd flower in the first photo, overlap and glue.
Now you should have 4 parts to your flower. assemble by starting the largest flower and glue inside it the next largest and so on. they will stack inside each other to form the rose.

Paint any craft stick you like for the stem. push through the flower in bottom center. I used strong glue dots for this
Brush on your favorite glue with paint brush or spray glue and sprinkle with glitter to match flowers.
 I could not find a vase at home I wanted so I wrapped in red tissue paper and tied white ribbon. The next photo shows the vase
27 comments:
I think this is really cute. I'd like to try it with gumpaste on my crocus cake. Did you use a flower from a cartridge or svg?
These roses are beautiful!!! Thanks for the tutorial.
Your bouquet turned out really pretty:) I like it. Thanks for sharing how you made it.
~Madison
I love them. Thanks for sharing
Beautiful, beautiful, beautiful and oh so clever !!!! Loved it. Gotta try it. THX so much for sharing !!! :)
Just stunning! I love the glitter and the red and white contrast. Thanks for the tutorial too!
tweeted:
https://twitter.com/bcorona09/status/19006530188
posted on cricut mb's
http://www.cricut.com/messageboard/tm.aspx?m=6859864&mpage=1&key=�
Those are so beautiful.
http://ikolinda.blogspot.com
Oh Wow Chris,
These look great. I may need to try this myself. Down the road. Not now, have too much going on right now. I'm going to put a link for this up on my blog hope that's okay. That way I can find it easier.
Take Care.
That webcast was wild yesterday. I didn't know I needed to open up another screen. So, I had a big disadvantage!!! But, next time I will be more prepared. I'm new to all of this.
wowwwwwwwww you made this look so easy and beautiful. I really want to try this! wow.
Thank you for inspiring us all!
Oh, that is really neat... I'm gonna have to play with that idea. Its always fun to make your own flowers... cause then they match perfectly! Thanks for sharing this.
These are really pretty. Thanks for sharing how to make these:)
~Madison
Thanks for sharing. What did you use to create the roses? It looks like vinyl.
I LOVE THESE! I have seen them but didn't know how to make them! Thanks so much for the instructions!
Chris, these are beautiful and thank you for making that reference over on FB that you had the rose steps here on your blog. Thank you so much. I have this set of punches I bought ages ago on the mainland and transported backto Hawaii and this technique will work so well with those punches. They are graduations of a flower. Mahalo from Hawaii
The roses are beautiful and such a clever idea. Thanks for the instructions.
Love the roses they are really beautiful. michellecrawford80@yahoo.com
These are really pretty. Your projects are fabulous!
Chris,
Thank you for posting the detailed tutorial!!! :) These flowers are beautiful! Did you glimmer mist them or was that glittered paper (for the red ones)?
Have a great day,
Jennifer
Beautiful! You did a great job!
really cute boquet.love the shimmer.tfs
How cool! I have been looking for a way to make some pretty flowers for my dining room table and my living room. Thanks for the great pictures and instruction!
Whitney
TFS! I have been looking aorund for things to make for my (soon-to-be) 4 year old granddaughter's upcoming birthday party. She wants an "Olivia the Pig" party and since Olivia loves roses, this would be perfect!!!
This super cute and perfect for Valentine's day I'm wonder how you make it.
Lucy =)
Hi i am so pleased I found your blog, I really found you by mistake, while I was searching Yahoo for something else, At Any Rate I am here now and would just like to say thank you for a wonderful blog posting and a all round intriguing blog (I also love the theme/design), I do not have time to read it all at the right now but I have bookmarked it and also added your RSS feeds.NFL Hats-football hats,wholesale nfl hats,Canada Goose Coats
Post a Comment