
CARD AND ENVELOPE


Used Cricut Expression Machine
Cricut Holiday Cakes and Plantin School Book cartridges
Bazzil White, Black, Red, Yellow Cardstock For all layering of the card and envelope, plus die cuts from Cricut Cartridge
Card is made with 81/2 x 11 size scored center/folded. Every additional layer on the card is reduced by 1/4. Edge to Edge adhesive was apply by using the 9" Xyron machine and place on card.
Cut from Holiday Cartridge the #1 Dad Tag at 3 1/2" cardstock (Yellow). Cut a second time using the shadow function key cardstock (Red)
With Piercer Tool/pierce at 3/4 inch in from both top corners and add Gold Brads. Attach to card with xyron machine
Matching Envelope 5 x 7 White linen from Michael's Crafts
Now it is time to cut a strip of black cardstock 5" x 3"
Cut strip of Yellow cardstock 5" x 3" emboss with design of choice.
I used my Big Shot Machine and a Cricut Emboss folder to add texture to the yellow strip
Cut a strip of red cardstock. The Xyron adhesive machine makes it easy to apply my layers to the envelope
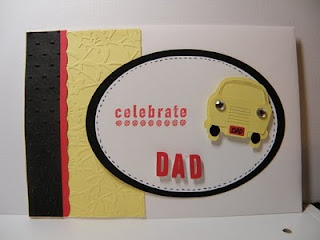
Using Plantin School Book Cricut cartridge cut out the oval label at 3 1/2" first in black, then 3 1/4" in white... apply with Xyron adhesive machine. Now with fine tip marker (black) make stitch marks all around the white (oval) label..to make it appear you had sewn black thread around the label. Layer the Oval labels
Now Remember the #1 Dad die cut from the Holiday Cartridge above. You can now take the "Dad" Positive cut and apply pop dots and attach to your white label
Holiday Cartridge die cut image (little car) yellow cardstock was cut at 1 3/4".
Using the layer key function cut out the tag in red cardstock..attach to car.
Add Clear Rhinestones for headlights using Glue dots mini dots. Add all layers with foam dots
The sentiment was adding using 3 Birds All Occasion Stamp "Celebrate" using BlazingRed StazOn Solvent Ink Pad. I chose to off set my stamp